Showing posts with label article. Show all posts

2015/07/27

Let's code a Big Integer (part I)

Introduction

I like to solve programming contest problems once in a while, and sometimes, while working on it, I've been forced to switch from C++ to either Java or Python (and more recently to Haskell) to use the multi-precision integer support of those languages, a.k.a BigNums or BigIntegers. Both Python and Haskell have this feature in the very core of the language, meanwhile in Java you have to create an instance of the BigInteger class an invoke its operation methods in chain, thus creating some verbose expressions:

I've been always intrigued by how BigInt works; this gives me a excuse to delve around this topic, so I decided to craft my own C++ BigInt class to deal with this issue just for fun.

Approaches

As far as I've found, there are two approaches to implement BigInteger's (you may find out later that they are basically the same approach using different data types), the first approach uses an array of chars where each char represents a digit of the big number, for example, 30! = 265252859812191058636308480000000 would be represented as:

This approach is easy to understand/implement and is fine for time tightened competitions with loose memory constraints, but for a more general solution, is a waste of memory.

Consider that each char can represent up to 256 different values (if and only if sizeof char is 1) and this approach represents only one digit per char. There are a few tricks to make better use memory, like storing two digits per char instead of one and so on. Either way, this representation will waste memory, especially with longer streaks of digits, and efficiency in operations will be compromised because the bigger the memory we use, the longer the algorithms take to iterate over the data (duh!).

The second approach, more memory efficient, is the one used in the BigInteger Java class. It stores the bits that compose the number across an array of several ints, for example, the binary representation of 30! is:

30! = 110100010011111101100011011100001111100101101000011001011101111101011101110101010100000000000000000000000000

Those are 108 bits, every java integer occupies 32 bits, so the number can be split over 4 int values:

30! = [110100010011, 11110110001101110000111110010110, 10000110010111011111010111011101, 01010100000000000000000000000000]
= [3347, -164163690, -2040662563, 1409286144]

Or, if you chose to use unsigned integers as words instead:

= [3347, 4130803606, 2254304733, 1409286144]

As you can see, 30! can be held in an array of 4 32-bit int's (16 bytes) where the first element (element at 0) contains the most significant bits and the last element (element at size - 1) contains the least significant bits. On the other hand, the previous approach needed 33 bytes to store the number, a difference of 17 bytes. You can see in the following graph the difference in bytes of both techniques as the number grows in digits.

As you can see in the chart, calculating the factorial of something like 140000 (140000! has 659660 digits) requires around 70000 bytes for the first approach and 25000 for the second.

(The more clever of you will notice that both approaches are the same, both represent the number as a polynomial and the variable is char for the first and int for the second).

Construction

Constructing a BigInt from a String

Dissecting the algorithm that constructs a BigInt from a string that resides in one of the class constructors, we have the following steps, for base 10 numbers, the constructor basically operates as follows:

  1. Check the sign character and skip the leading 0's from the number string.
  2. Estimate a possible number of bits for the big number, this value is greater or equal than the real number of bits the number has, p.e., 30! has 108 bits, this step in the Java's BigInteger algorithm's will estimate 110 (110 >= 108).

    Why an approximated number of bits, why no calculate the exact number of bits? (See more...)

  3. Given the estimate number of bits, the next step calculates the number of required words needed to store the big number, p.e., To store 110 bits, 4 words are required. A very simple algorithm to do this calculation is:

    Just for fun, if you want to get rid of the conditional part you can also do:

    (See the explanation...)

  4. Following step consist of splitting the number string in groups of N digits, where N is the number of base 10 digits that are guaranteed to fit into a 32-bit int, for base 10 this is N = 9. Why 9? Because the maximum decimal number with 9 digits is 999999999 has 30 bits and the maximum decimal number with 10 digits is 9999999999 and has 36 bits, the last one overflows.

    For our 30! example, this step returns 4.

  5. For this step is important to remember that the first element (element at 0) in the array contains the most significant bits and the last element (element at size - 1) contains the least significant bits. Then, starting from the smaller group, convert the 9 digit string to an int, then multiply all the elements of the array by 109 (starting from the last element) and carry the bits that overflow the result to the next array element (current index - 1).

    This can be visualized better with an example, remember that 30! was split in 4 strings: "265252", "859812191", "058636308" and "480000000", we start the process with the more significant digits, for this case "265252" is took as the starting group, it is multiplied by 109 to open up space to add the following group of digits:

    265252 ✕ 109 = 265252000000000

    Now we add the following group of digits and repeat by scaling the result again with 109

    265252000000000 + 859812191 = 265252859812191

    265252859812191 ✕ 109 = 265252859812191000000000 ...

    The following table resumes the four iteration loop that deals with all the groups:

    Current Bignum value Bignum value after scaling by 109 Group to process New Bignum value Array value
    0 0 265252 265252 [0, 0, 0, 265252]
    265252 265252000000000 859812191 265252859812191 [0, 0, 61758, -25421473]
    265252859812191 265252859812191000000000 058636308 265252859812191058636308 [0, 14379, 1659331918, 396996116]
    265252859812191058636308 265252859812191058636308000000000 480000000 265252859812191058636308480000000 [3347, -164163690, -2040662563, 1409286144]

    Multiplying by 109 opens up space (adds nine 0s) so we can add the new group to the current number using a simple add arithmetic. The array values can look odd because we are dealing with a huge decimal number split across several int's. The operation that multiplies all the array elements by 109 takes care of the carry and then sums the new group element. This last operation is implemented in method destructiveMulAdd inside the java's BigInteger class.

    At array level, you can view the number as a polynomial where every array entry is a coefficient, then this operations works as follows:

    \[ a\left[0\right] + a\left[1\right].x + a\left[2\right].x^2 + ... + a\left[n-1\right].x^{n-1} \]

    Where x = 109. Scaling the number is a matter of multiplying the polynomial by 109:

    \[ \left(a\left[0\right] + a\left[1\right].x + a\left[2\right].x^2 + ... + a\left[n-1\right].x^{n-1}\right).10^9 \]

    With x = 109, there is a chance that the value of the coefficient overflows after scaling, so we have to use a temporal variable to carry the overflow of every local multiplication from the $kth$ element to the $kth + 1$.

What next?

In the next article, we will be dealing with the implementation of the basic arithmetic operations

2015/01/23

Liquify effect with Javascript (Hello swirl 2)

Introduction

Following the previous article, we'll now create a new image effect to practice the acquired knowledge about image manipulation with Javascript. This time, we'll be doing something that resembles the Photoshop Liquify filter (although this one is not a filter but in fact a warping tool). The formula we are going to develop in this article can be be found in the very old, funny, awesome and freely available book: Beyond Photography - The Digital Darkroom, exactly at Chapter 4, pages 34 and 35.

Here you can see an animation of what we'll be able to do after this tutorial:

 photo result_zpsppn7wvbe.gif

Setup

You'll be using all the setup code that we crafted in the previous article, the only thing I have changed for this tutorial is the test image, I replaced it with another from the Geek Office Dog comic, and of course, you can use whatever you want.

Image transformation

One more time, the pixels that you're going to transform lie within a square about 1/2 of the image in the center region.

The code to iterate the pixels over the center area is the same:

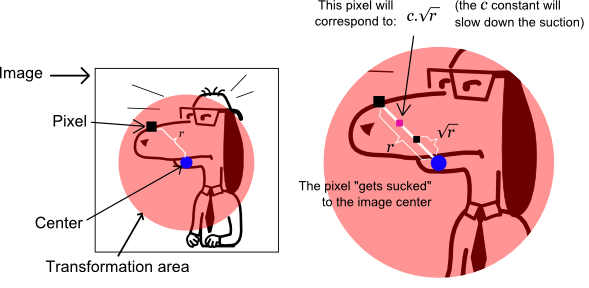
To transform a pixel inside the area of interest, first, convert the pixel Cartesian coordinates (x, y) to polar coordinates (r, α), then transform it, and once finished with the transformation, write it back to the destination image.

The transformation is different from what we did before, this time we're going to take the square root of the pixel r polar component and then multiply it by a constant factor c. The main idea of this filter is to make the image look like is being sucked into the center.

the effect illustrated

(The constant factor c doesn't need to be constant at all, in fact, to animate the effect, we are going to change it over every frame).

Here we have the effect code, very similar to the Swirl algorithm we coded before but with the "new" transformation:

The implementation is straight forward, and here you can visualize the result:

sorry, no canvas, please, upgrade your browser

I bet that the result isn't quite what you expect it to be, as you can see, there is a huge discontinuity on the edge of the interest region, caused by the fact that you are using the same formula in the whole interest area, so depending on c, the resulting r will be sampling pixels outside the interest region and sucking them into the center. You can experiment with different values for c and the results will always have discontinuities around the edges of the circle.

Fix discontinuities

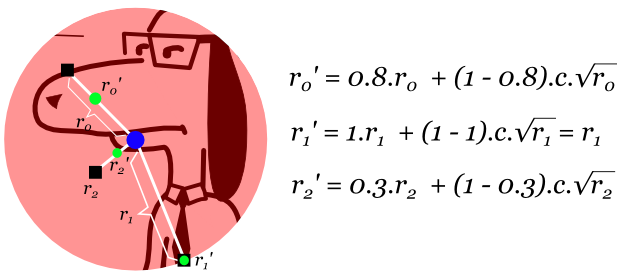
We want that pixels near the edge to not to be transformed that much, to stay the same, also we want that those pixels near the center of the interest region get transformed the way we established with the formula above, So, how can we do that?... Well, linear interpolation is a cheat solution for this problem. We know that pixels around the edge shouldn't be converted, so their r component value should be kept, and we know that pixels closer to the center should be transformed, so their r component value should more like c.√r. If we divide r by the radius of interest area, we'll obtain a number between 0 and 1, 1> (or closer to 1) for those r values that are near to the circle edge and 0 (or close to 0) for those near the center, as we can see in the following image:

factors depending on interest region radius

Then, we apply this factors to interpolate between r and c.√r, as stated before. The resulting interpolated values ri' that are close to edge won't be transformed that much, avoiding discontinuities, and the closest to the center will be transformed without regrets, see the following image:

linear interpolation of r

Green dots are the resulting ri' interpolated values. The following code implements the formula described here:

Watch the results:

sorry, no canvas, please, upgrade your browser

Now, this is much more what we were after, isn't it? To conclude our effect, let's add animation to it.

Animating the effect

Animation can be achieved as in the Swirl tutorial but changing the c factor instead with time. The implementation should be easy to follow from the previous article:

Check out the result:

sorry, no canvas, please, upgrade your browser

Not bad at all, but it could be better if we add bilinear interpolation:

An here, the final result:

sorry, no canvas, please, upgrade your browser

Liquify Tool

The following is an example of a simple online liquify tool done with the algorithm described in this article:

Source code for this last demo can be found at github.

Conclusion

In this post, you have learned a warping technique (the less sophisticated of all the warping techniques existing nowadays) and used linear interpolation to avoid discontinuities at edges. In further articles we could be dealing with other effects and image manipulation techniques, but for now give your pixels a rest. Thanks to Pong Mia for the suggestion on doing this article.

2014/10/19

Example of use of Karnaugh maps (fun stuff) in business application code (boring stuff)

Introduction

In Computer Science (CS), you'll encounter a lot of awesome theoretical concepts that are forgotten once you start working on a job where you don't need to apply them very often.

One very interested subject taught in CS is Karnaugh Maps, which takes a truth table as input and outputs the minimal equation that behaves exactly as the given truth table. You can see an example in the following figure:

You can always come with excuses to apply things like this in your job and have some healthy fun; and we did just that back in 2011, we took a requirement and apply this technique to do some optimization. First let me give you some context.

Context

As I told you, back in 2011 we developed an application that lets clients transmit information to our servers. Prior to the transmission, the client data must meet some criteria defined by a set of rules; our users generates such rules using a graphical language in a server side app (also developed by us) and then this server applications sends the bundle with the rules to the client app so it can apply them to the user data files.

The server side app UI mimics a spreadsheet program in several ways and features a graphical rules language.

The following figure depicts the application flow:

The graphical rules language (GRL) has support for functions. Users has several functions at their disposal to choose from. Sometimes a requirement consisted in adding a particular function to the GRL in order to help with some particular task, calculate the number of days between two given dates, percentages, interests rates, and so on.

The validation function

User data files are a collection of "~" separated fields, values are spread over several lines. File size can range from several Kb to some Gb, and validation speed is an important aspect of the client app.

One day users requiered clients to send a collection of values (like a set) encoded in just one field value. For it, they were also needing a new function that could check if the values sent by the user contained valid elements. The next figure will depict the general idea:

To encode the set in one field, we proposed the use of binary encoded values and our users (without much knowledge about binary encoding) agreed; so, if the users defined valid values to be: 1 (000012), 2 (000102), 4 (001002) and 16 (100002) and a client wanted to send 1 and 16 (because he/she just has those two values to report), the client just need to send the result of the binary OR, i.e., 1 OR 16 = 1 + 16 = 17 (100012) as the field value.

To validate the sent result, the required function just need to check if the bits set in the sent result are also set in a valid mask (yes, there should be a mask created with the binary OR of all the valid values). An example of a Java code that does this is the following:

This was a first solution to the problem. After some though it came to us that we could improve this solution a little further and get some fun by doing it.

Using Karnaugh maps to optimize the validation function

Applying Karnaugh maps in the proccess explained above we get following; first we drew the truth table for our validation function working at bit level of the function result:

From the above we can derive this Karnaugh map and its resulting equation:

So, how do we apply this? Basically we are working at bit level on both the sent value and the mask, once the algebraic equation is applied the resulting value should be -1, that is, all resulting bits should be 1; if just one of the bits of the result is 0 then it means there is an invalid value (one of the items seleted by the client is not present in the list of valid values defined by the users) and we should reject it. The following example visually exposes the aforementioned explanation:

So, the code for the function simplifies to this:

Another solution

Another approach to solve the problem is to work with the complement of the function in the truth table, aiming to find when the function should be invalid instead of when is valid, which yields a map with less 1 values to simplify:

The code for this function works different than the previous solution, for this case we are looking that all the resulting bits should be 0, which means that if one of the bits is set then there is an invalid value. The following example shows the same situation as above applying the new equation.

And the code for this solution is the following:

Conclussions

Simpler code doesn't necesarilly means more readable code, as you can see in both of the examples above, the code would be harder to understand for somebody unexperienced with the codebase and can even catch out of guard those who has most of the experience with the project code. Despite being an elegant solution, maintaining such code will require the coder to even review Karnaugh maps theory, besides that, any performance gains would be only noticeable if you execute the method around 1000000000 times (tested in a i7 machine with 8 gb of ram on jdk 7), and all of this could label this solution with the Accidental complexity tag.

Anyway, solving this rather simple problem and then doing the optimization using something that is not frequent in the context of backend business code was a really gratifying experience in terms of getting out of the routine and getting a lot fun. Maybe you can use this as an inspiration to tacle a requirement in a different and unorthodox way.