
Introduction
Following the previous article, we'll now create a new image effect to practice the acquired knowledge about image manipulation with Javascript. This time, we'll be doing something that resembles the Photoshop Liquify filter (although this one is not a filter but in fact a warping tool). The formula we are going to develop in this article can be be found in the very old, funny, awesome and freely available book: Beyond Photography - The Digital Darkroom, exactly at Chapter 4, pages 34 and 35.
Here you can see an animation of what we'll be able to do after this tutorial:

Setup
You'll be using all the setup code that we crafted in the previous article, the only thing I have changed for this tutorial is the test image, I replaced it with another from the Geek Office Dog comic, and of course, you can use whatever you want.

Image transformation
One more time, the pixels that you're going to transform lie within a square about 1/2 of the image in the center region.

The code to iterate the pixels over the center area is the same:
To transform a pixel inside the area of interest, first, convert the pixel Cartesian coordinates (x, y) to polar coordinates (r, α), then transform it, and once finished with the transformation, write it back to the destination image.
The transformation is different from what we did before, this time we're going to take the square root of the pixel r polar component and then multiply it by a constant factor c. The main idea of this filter is to make the image look like is being sucked into the center.
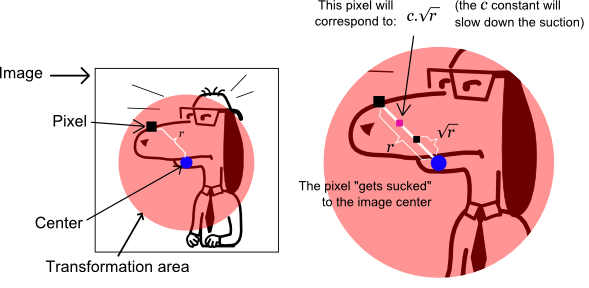
(The constant factor c doesn't need to be constant at all, in fact, to animate the effect, we are going to change it over every frame).
Here we have the effect code, very similar to the Swirl algorithm we coded before but with the "new" transformation:
The implementation is straight forward, and here you can visualize the result:
I bet that the result isn't quite what you expect it to be, as you can see, there is a huge discontinuity on the edge of the interest region, caused by the fact that you are using the same formula in the whole interest area, so depending on c, the resulting r will be sampling pixels outside the interest region and sucking them into the center. You can experiment with different values for c and the results will always have discontinuities around the edges of the circle.
Fix discontinuities
We want that pixels near the edge to not to be transformed that much, to stay the same, also we want that those pixels near the center of the interest region get transformed the way we established with the formula above, So, how can we do that?... Well, linear interpolation is a cheat solution for this problem. We know that pixels around the edge shouldn't be converted, so their r component value should be kept, and we know that pixels closer to the center should be transformed, so their r component value should more like c.√r. If we divide r by the radius of interest area, we'll obtain a number between 0 and 1, 1> (or closer to 1) for those r values that are near to the circle edge and 0 (or close to 0) for those near the center, as we can see in the following image:

Then, we apply this factors to interpolate between r and c.√r, as stated before. The resulting interpolated values ri' that are close to edge won't be transformed that much, avoiding discontinuities, and the closest to the center will be transformed without regrets, see the following image:
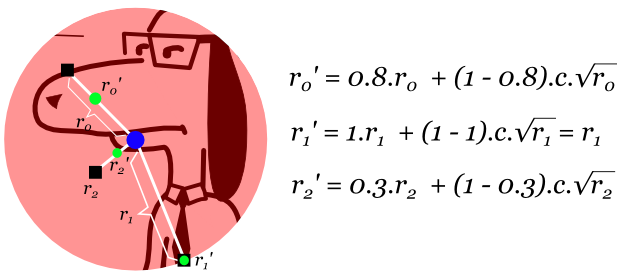
Green dots are the resulting ri' interpolated values. The following code implements the formula described here:
Watch the results:
Now, this is much more what we were after, isn't it? To conclude our effect, let's add animation to it.
Animating the effect
Animation can be achieved as in the Swirl tutorial but changing the c factor instead with time. The implementation should be easy to follow from the previous article:
Check out the result:
Not bad at all, but it could be better if we add bilinear interpolation:
An here, the final result:
Liquify Tool
The following is an example of a simple online liquify tool done with the algorithm described in this article:
Source code for this last demo can be found at github.
Conclusion
In this post, you have learned a warping technique (the less sophisticated of all the warping techniques existing nowadays) and used linear interpolation to avoid discontinuities at edges. In further articles we could be dealing with other effects and image manipulation techniques, but for now give your pixels a rest. Thanks to Pong Mia for the suggestion on doing this article.
Hi,
ReplyDeleteYour article helped me a lot.
Is this possible with area of interest as 'Rectangle' and that too not at the center of the Image but at user defined (x,y) coordinates?
Yes, it can be done, I posted a liquify tool demo on the article to show how it can be done. The source code is available at https://github.com/higuaro/liquify-tool
DeleteHey Higuaro! I am Fuzzy Wobble. It would be great to talk with you more about this tool but I cannot find your email. Can you please contact me. Find my email on my site. Thanks!!!
ReplyDeleteSorry for the late reply, I'm just seeing this now (was on a Blogging hiatus). My mail would be henry dot eduardo at gmail.
DeleteThis comment has been removed by the author.
ReplyDeleteHi, Higuaro i am looking a way to convert this code into Android Java form, can you help to convert it
ReplyDeletei will be glad if you can.
While i am converting this to android java i realized that Javascript handle image differently than java in Android
ReplyDeleteNice article, real-time training makes a huge difference in learning.
ReplyDeletefull stack developer course with placement in hyderabad