
Introduction
Nowadays, JavaScript power and the HTML 5 set of cool features let us do image manipulation effects directly in the browser without resorting to any external plug-ins like the Java Plug-in.
This entry is about the Swirl effect, an image effect that basically swirls the pixels around the center of an image to the left and/or to the right like some kind of vortex (if you've ever used Windows 98/ME, you may recall the swirl screensaver that was shipped with it). Watch the following animated gif to see it in action:
 The effect consist in the individual rotation of the image pixels by an angle that is proportional to it's distance from the center, it could sound complex, but it's not. At the end of this post, you should be able to fully understand and implement the effect by yourself using JavaScript and HTML 5 canvas, also it will serve you as a basis for others JavaScript image manipulation effects to come.
This entry is about the Swirl effect, an image effect that basically swirls the pixels around the center of an image to the left and/or to the right like some kind of vortex (if you've ever used Windows 98/ME, you may recall the swirl screensaver that was shipped with it). Watch the following animated gif to see it in action:
Loading the image and getting the pixels
<script></script> tags:
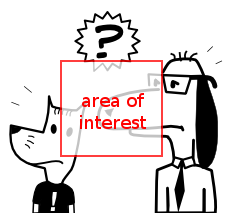
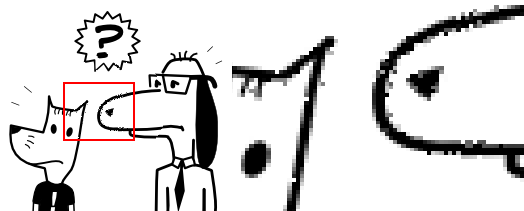
I'll be using the following image for testing from the Geek Office Dog comic, of course you can use any other if you want:

onload function to draw the loaded image in the canvas and then ask the canvas to create an array with its content that will be passed to another callback that will (alongside with the canvasId) do the pixel manipulation and draw the result. The grabImageData function below summarizes the process:
IMPORTANT: The above code will generate the following error message in Google Chromiun (version 20.0+) if you just opened the html file directly into a browser tab by double clicking on it from your file explorer:
This is due to some local file loading policy issue when the code tries to read the pixels by means of the
I've tried to solve this problem with no luck. To do proper testing in Chrome, we will need a personal html server installed locally. Fortunately, you could use Firefox (in my case, version 17.0) without resorting to a local html server and test there.
"Unable to get image data from canvas because the canvas has been tainted by cross-origin data"
getImageData function and will also throw the following error message:
"Uncaught Error: SecurityError: DOM Exception 18"
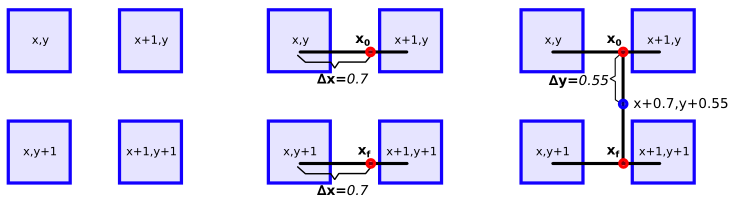
Image rotation
 See the rotation fixed:
Swirling stuff
degrees += 30.0 sentence with degrees += 4.0 * r (only that sentence), here you have the result:
Animating the swirl
degrees += r * 10 * step;.
step parameter could be fit in a for loop that encloses the pixel iteration loops, and after every transformation you could call drawPixels to refresh the image... But, it won't work... The only thing that you'd see is the final image after the final step is processed, all the intermediate frames will be lost.
step parameter, do the image manipulation and then calls the drawPixels routine, this function can put itself in the invocation queue using the setTimeout function, so it will be invoked later with a modified step parameter and it will (after a short amount of time) repeat the process and render the next animation frame. Avoid loading the image every time you enter in the animation function declaring this inside the swirl function, so the (let's call it animate) function will have access to the loaded pixels and it won't need to load the image again.
setTimeout call, pass another function as the parameter and inside this new function, invoke the animate function with the incremented/decremented step, like this:
You can toy with these parameters, you could add a direction parameter to the animate function to indicate if the animation should go left or right, you can even do a little pause when the step is close to 0, so the user will watch the original image for a brief moment before the animation stars over again, and the list goes on.
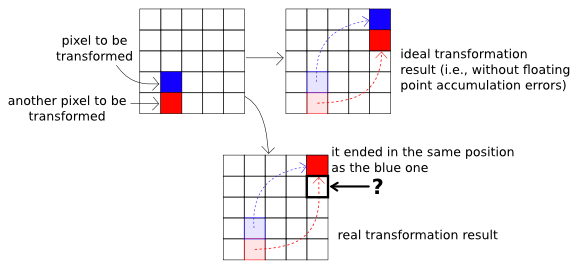
Bonus, Bilinear Interpolation
Thank you!!!
ReplyDeleteThis comment has been removed by the author.
ReplyDeleteHi. Great article. I'm also creating a similar effect "pinch" and I'm getting these "artifacts". Is there anyway I can contact you? I could use some pointers in applying backwards transformation.
ReplyDeleteI found your blog while searching for the updates, I am happy to be here. Very useful content and also easily understandable providing.. Believe me I did wrote an post about tutorials for beginners with reference of your blog.
ReplyDeletepython Course in Pune
python Course institute in Chennai
python Training institute in Bangalore
Thanks For Sharing The Information The information shared Is Very Valuable Please Keep Updating Us Time just went On reading The article Python Online Training Aws Online Training Hadoop Online Training Data Science Online Training
ReplyDeleteAttend The Python training in bangalore From ExcelR. Practical Python training in bangalore Sessions With Assured Placement Support From Experienced Faculty. ExcelR Offers The Python training in bangalore.
ReplyDeletepython training in bangalore
Thanks for a most informative tutorial. You explain the process of processing pixels in a javascript array so clearly.
ReplyDeleteYour code works perfectly until I change the line ‘ degrees += 30.0;’ to 'degrees += 4.0 * r’
The image stays the same - no swirl effect!
I am using Safari as a browser and MacOSMojave on an iMac.
I added the swirlAnimated function and this did not work either.
BTW your function rotateFixed is missing the canvasId parameter and I think you should include the total code for the function as this may confuse some readers.
Stupid me - I was modifying the wrong file. It all works fine now!
ReplyDeleteI have to voice my passion for your kindness giving support to those people that should have guidance on this important matter.
ReplyDeletesap s4 hana training in bangalore
sap s4 hana courses in bangalore
sap s4 hana classes in bangalore
sap s4 hana training institute in bangalore
sap s4 hana course syllabus
best sap s4 hana training
sap s4 hana training centers
Thanks for the post. Do you think it's possible to apply this swirl effect to entire html page? Not only images.
ReplyDeleteThe emperor casino - Shootercasino
ReplyDeleteThe emperor casino 바카라 제왕카지노 The febcasino Empire Casino is the best online casino in Canada for Canadian players that want the best value and competitive gaming experience for Canadian